| Panel | ||||||||
|---|---|---|---|---|---|---|---|---|
| ||||||||
To learn about the basics of Motive and getting set up, check out the Platform Essentials course in Motive Academy. |
Quick Links
| Table of Contents | ||||
|---|---|---|---|---|
|
Provision your headset on Motive Storyflow
Provisioning your headset ensures that your training content is only viewable to devices that have the proper permission.
There are two ways to provision your headset on Storyflow. Your headset may be configured to be pointing at Launch Server or Storyflow. You can access Storyflow in either case.
Provision on Storyflow when Pointed at Launch Server
You will know if your headset is pointed at Launch Server if the following screen is visible when you start your VR app.
...
In this case, follow these steps:
Click the Choose Cancel button.
On your left VR controller, click the flat button near your thumb. It has three horizontal lines on it. This menu will appear:
...
4. Click the Choose Admin button. 5. This menu will appear:
...
6. Click the Choose Storyflow Author button.
7. Follow the procedure below.
Provision on Storyflow when Pointed at Storyflow
1. Open the VR Scenario on your headset.
2. You will see the screen below. Choose Connect with your controller:
...
3. You will see an Make note of the authentication number:
...
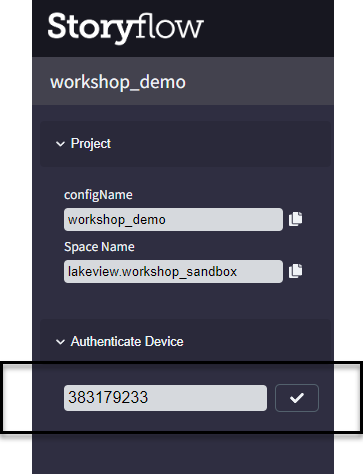
4. Open Storyflow and go to the Project you are working on .
On the left hand side of the screen, enter the same code into the Authenticate Device field and click the checkmark icon:
In Storyflow you will see confirmation that the device was authenticated:
...
In the headset you will then be directed to choose the Organization, Workspace, and Project you want to view:
...
57. Choose the Scenario you want to run in the headset. This should match the Project in Storyflow you are authoring:
...
Now view the scenario experience in the headset.
Keep Your Headset Provisioned
You can avoid needing to reprovision your headset each time by following these steps:
On your left VR controller, click the flat button near your thumb. It has three horizontal lines on it.This menu will appear
Choose Admin:
...
3. Click the Admin button.4. This menu will appearChoose Debug:
...
5. Click the Debug button.64. Under Storyflow Authoring, check the Stay Logged In checkbox.
75. Click the Close button.
...
This will ensure that you do not need to go through the provisioning step each time you restart the app.
| Note |
|---|
If you have issues provisioning your device, see our Troubleshooting article here. |
